Let's get started ..
Posted on November 14, 2019 • 3 min read • 468 words
Starting out with new blog plattform can be time consuming and daunting task. To my suprise a path from zero to hero with HUGO and AWS Amplify was a breeze. Here I’ll describe how to setup your own serverless static website.
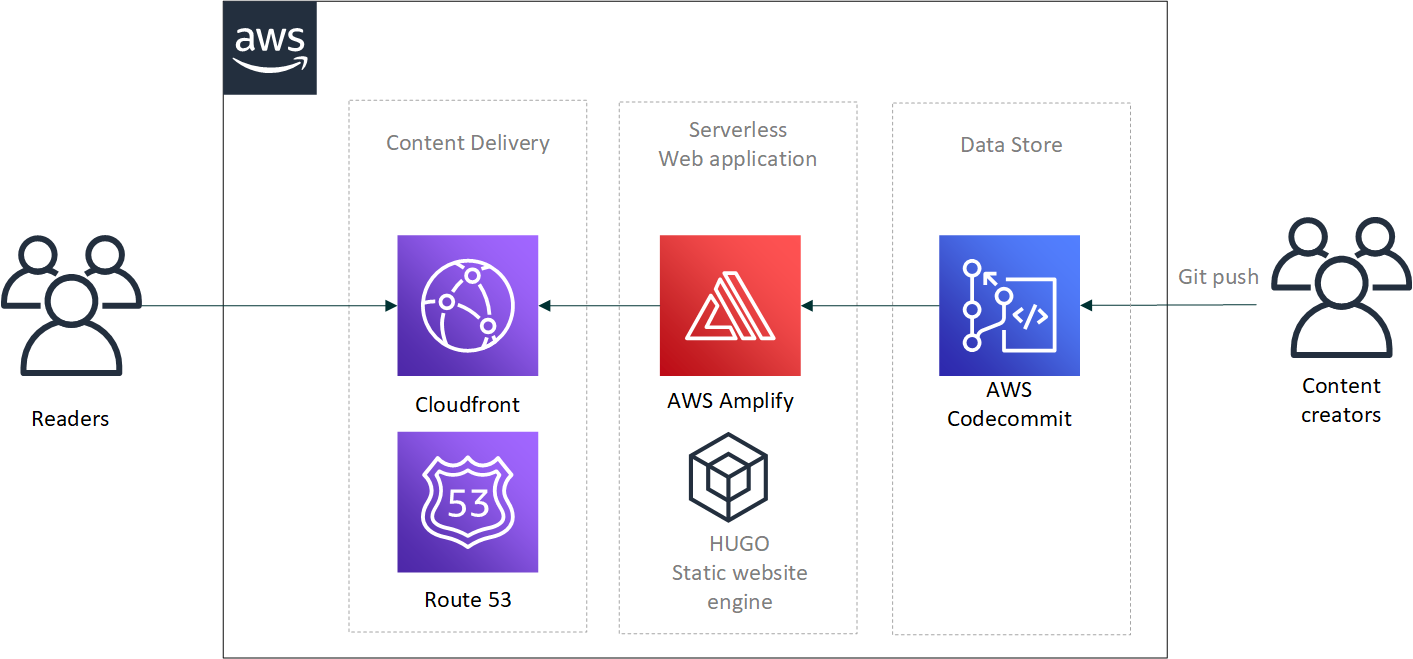
Architecture
High level architecture is described on figure 1. Main components for this setup are AWS Amplify, Amazon Cloudfront and AWS CodeCommit. These AWS services provide the serverless publishing pipeline for the Hammer’s Lair site. Another major component on this setup is HUGO which create the structure and content of the website.
AWS CodeCommit
First step is to create a CodeCommit repository where you store all your website content, theming and hugo configuration items. Simply follow up this guide to create and configure a git repository. AWS CodeCommit walktrough.
After setting up your CodeCommit enviroment and repository clone a repository onto your working directory and head up onto next phase.
HUGO
The world’s fastest framework for building websites Hugo is one of the most popular open-source static site generators. With its amazing speed and flexibility, Hugo makes building websites fun again.
HUGO website
All the content on the website is created with HUGO static website generator. HUGO takes Markdown files and convert them to HTML pages, during conversion HUGO does some magic and include theme formatting onto output.
Follow up
these articles to install and configure HUGO on your computer.
head up to your working directory and create a new HUGO site with following command:
hugo new siteLaunch your Markdown editor and store index.md at the root of content folder. Good Introduction to Markdown syntax can be found here.
Backbone services
Setting up backbone is straightforward process, all you need to do is to connect Amplify onto repository you created earlier. Amplify will automatically detect HUGO project structure and walk you trough the configuration. Defaults will do on your first Amplify powered static web site. At the end of process you will get a link to amplify project front end. Launch your browser and type in URL, Amplify gave you and, your done. Congrats, you have done it.
Later on when adding add new content or modify existing one, use text editor and store your files under content folder. When you Commit and push you changes back to repository Amplify will launch builtin process to build and distribute your new website onto Cloudfront, all this happens automatically without any user intervention.
Conclusion
Setting up Hammer’s lair website took just a few hours, most of the time was used to get decent theming in place, and playing around with HUGO settings. Now I’m exploring mobile tooling for Markdown editing and GIT so I can add content while I’m on the road.
Happy Hacking,
- Hammer -